Some time ago I found a treatise on wagon and carriage making that was written in 1951 by Fred Ronstadt (1868-1954), who apprenticed as a blacksmith in a Tucson, Arizona wagon shop in 1882, and started his own wagon shop ten years later.
What I found especially interesting was how they finished carriage bodies — early automobile bodies were finished in the same way. He explains that building a high quality body for a carriage “was an art in itself,” and that even a good carpenter or cabinet maker would be unable to do it properly.
Body frames
Body frames were fashioned of oak and body panels of poplar. Next a skilled blacksmith would make all the ornamental and functional iron fittings which were fitted to the curved bodies while hot, “but not hot enough to burn or even char the wood” and that had to be made to “the proper sizes and proportions to stand the service and look graceful and pleasing to the eye.”
After the irons were made and fitted to the body, but not attached, they went to a finisher who filed the forgings smooth and bright and drilled the holes for the bolts and screws used to attach them. Each bolt hole was made for a driving fit and then the irons were carefully screwed, bolted or riveted to the already primed body.
When all this had been done properly, the parts of the carriage would remain tight and solid for many years. All the wood parts had been primed with a mixture of boiled linseed oil, a little turpentine, white lead, and usually gray coloring.
The running gear, which consisted of the wheels, axles, thills and reach, was usually made of hickory for the better carriages, and the painting of the gear was different from the body.
Painting and polishing
The painter would use oil putty and two coats of primer to close the pores of the wood. When these primer coats had dried, two or three coats of lead and linseed oil were applied, followed by two coats of flat color.

After each of these coats had plenty of time to harden, the surface was polished with horse hair. Finally, two or three coats of rubbing varnish were applied and pulverized pumice stone on a pad of wet wool was used to polish the surface after each varnish coat had hardened.
For a fine coach or carriage, the running gear was given two coats of “rough stuff” over the white lead primer. Rough stuff was a filler with the consistency of heavy cream that dried hard, after which it was polished with fine sandpaper down to the white lead.
Then the flat color coats and varnish coats were applied and rubbed out. The decorative striping, in a color that would harmonize with the color of the gear, was now applied with pencil brushes made of fine camel hair.
When the striping was complete, a final coat of varnish would be applied that was put on thick, but had to dry smooth without brush marks or wrinkles. The bodies went to the trimmers after the priming coats had dried and he fitted the seat cushions and put the leatherwork in place.
Carriage seating
The cushions were made of good canvas fabric with a leather or cloth covering for the finish cover over an interior cushioning of excelsior with a thin layer of moss for the cheaper jobs, or horse hair stuffing for custom work.
The backs of carriage seats had spiral springs under the canvas padding. The leather finishing bead around the edges of the seat backs weren’t nailed into place until after the painting had been finished.
Trimmings
At this time the trimmer also made covers for the dashboards and fenders from patent leather, as well as the folding top with its cover and trimming, but these weren’t installed until the painting was finished.
More painting. The body of a good carriage was first given the primer of two coats of linseed oil mixed with white lead and then two coats of white lead paint. These were followed by a coat of wet putty, sandpapered smooth after it was dry and hard, and then two or three coats of rough stuff, each rubbed out after it dried.
When the last coat of rough stuff was dried and hardened, it was rubbed down with a piece of pumice stone and water until the surfaces of the panels were all polished like glass.
Next came two or four coats of a flat color, each dried coat rubbed out with horse hair before the next coat was applied.
Varnish
When all the color coats were dry, the first coat of rubbing varnish was applied.
This coat of varnish was polished with powdered pumice stone on a pad of wool cloth with water. Sometimes two coats of rubbing varnish were applied and polished before the body was striped.
The body was now washed with cold water and thoroughly dried with a good sponge and a chamois, taking care not to leave any scratches or water spots. The final finish coat of body wearing varnish was then applied.
Ronstadt wrote, “This last varnish had to be the very best. We used English Valentine varnish for which we paid ten dollars per gallon.”
The varnish room was kept dust free and at an even temperature of about 80 degrees. The painters applied the varnish as thick as possible with the finest camel hair brushes.
If any brush marks or wrinkles showed, it all had to be rubbed off with pulverized pumice stone on a pad with water and reapplied.
Quality carriages
The process of properly painting a good carriage required about three weeks and sometimes longer if the weather was damp. A one-seat buggy cost about $25 to $40 to paint, a two-seated surrey, $40 to $60, and a cabriolet or landau from $100 to $150.
These quality paint jobs would last from three to five years with proper care and washing, although the author said he had known of some that lasted as long as ten years. I was surprised to learn of the huge amount of painstaking hand work that went into carriage building.
Those old boys were really craftsmen.


Hi Sam
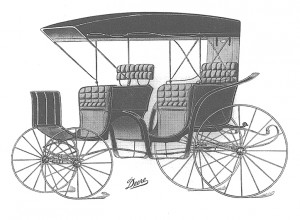
I enjoyed your article on Building Horse Buggies is an Art. Very interesting. However, as one who refurbishes old buggies for my driving horse, I do have to bring up a point re: the picture and the caption reading Landau, and Cabriolet. The carriage in the picture shows a topped Democrat carriage with some Phaeton-style features. Conversely, a Landau is similar the Visa-vis carriage, typically having 2 cushioned seats facing each other, plus the drivers seat up front. The Cabriolet is a sprung, two-wheeled single-axle carriage of French origins.
Again, I did enjoy your article.
Regards,
Dennis.